Showing posts with label cast on. Show all posts

Thursday, February 10, 2011

Bobble Cast On: a Tutorial, and some thoughts on personality...

Today was a really hectic day, with a lot happening at work...in fact this whole week has been quite a handful. I had great intentions to post this tutorial earlier this week, but you know...the road to perdition and all... so after some delay, here it is...

I was thinking about our kids today, and how different they are in some respects. I have been doing homework in the afternoons with the little one, and the Afrikaans spelling is just a giant weight on her shoulders! She really doesn't enjoy the subject at all, and I again realized just how different they are...my older daughter is fully independent (and has been from a very young age), gets on with her work, plans by herself, is studious and self driven. She does well at school and I never have to check up on her school things...The baby on the other hand, is a free spirit, with a natural tendency to art, music, drama and all things colourful. She is very bright, and also very responsible with her school work (she nags me to death to get her projects done early...), but is the absolute queen of drama. Nothing is done half measure, and all situations can be exploited for dramatic purpose...yet both children came from the same parents (yes...I promise ;) ), have grown up in the same environment, and have the same amount of attention and encouragement, yet they are so different in some aspects of their personalities....

So in a nutshell...do you think it's nature or nurture?

Above is a picture of a visit we made to the Dinosaur Park in Mpumalanga. Take a look at who is doing what....


Notice the bottled water and chic outfit...and the knees.... :)


And now onto other things...

The bobble cast on idea has a bit of a history. Since I fiddled with the Picot Cast On with a twist,
I have been plotting and scheming on how to make a bigger , fatter "picot". The only solution in my mind, is to make a bobble, but when I looked for some idea of how to do this, I couldn't find anything on the internet or in my book stash.... I sat for a whole day, fiddling and trying to figure out, and (it must be said, my faculties have lessened in acuity somewhat, since I had my kids...;) ), eventually came to the conclusion that one has to first knit a row before you can go ahead with the bobble bit. Good, I thought, I have learned something :)

I phoned my good friend Dana later in the evening, and told her of my herculean effort. "Oh", she said, "I know how to do that, I have a pattern for that!" .... it must be said that Dana is singularly talented, and in retrospect, of course she would know how to do this... BTW, she is releasing her new book this year...I have seen what is in it, and I tell you, it's a sizzler! So keep an eye out on her blog...

So....what is this all leading up to? If I happen to be the only person out there who doesn't know how to do a bobble cast on, forgive me! :) If there happens to be someone else who hasn't been classically educated in the art of bobbling, this is for you....


This is what you are going to learn to do. The tutorial is probably over explained, but I like to do this so that newbies can also manage...


Ok, you can pretty much do this Bobble Cast On in any yarn, although perhaps laceweight yarn won't make a bobble, more of a full stop. That being said, the technique is the same irrespective of yarn weight.


Cast on the number of stitches that you need. I left two side stitches, as you will see later, because it gives the work a little bit of an edge before the fat little bobble appears, and just looks better.

Knit one row, and turn your work around. Above you can see that I have done just that.


Knit 2 stitches. Throughout the tutorial I will refer to the left hand needle as the LHN, and the right hand needle, as the RHN.


Insert the RHN into the next stitch on the LHN. You are going to knit into this stitch as you would normally, but you don't drop the stitch you have knitted into from the LHN. Just leave the loop of yarn on there .


Above, you can see that the new stitch has been made , but the loop of the old stitch is still on the LHN.


This knit stitch you have just made on the RHN, is the FIRST stitch of your bobble. You will now do a YARN OVER. What this means , is that you aren't going to make a real stitch, more of a little cheat by just wrapping the working yarn around the RHN, in the direction as shown above.


Above, you can see how your work should look once the yarn over has been done. It is so easy to do...it is essentially just bringing your yarn towards you through the two needle points...


Insert your RHN tip into THE SAME STITCH as in the previous photos, and make a new regular knit stitch. (Notice, how the yarn over will created a clearly seen stitch once you have knitted a stitch after it)


Knitting a new stitch as normal....


New knit stitch pulled through , but again DO NOT DROP the LHN loop. In the picture above, I have labelled the new stitch a "half knit" stitch because I haven't completed the knitting motion, by dropping the loop form the LHN. You have now made 3 stitches of your bobble.


Do a second Yarn Over, just like before....


Knit into the same loop on the LHN as before...insert RHN into same loop on LHN...


Pull the stitch through but this time, drop the loop from the LHN. You have made 5 stitches for your bobble.


You have 7 stitches on your RHN, of which 5 stitches make up your bobble... You will concentrate only on these 5 stitches for the next rounds, making the bobble come alive :)


Turn your work around...it should look like the picture above...


Purl the first stitch.


The next stitch was made in the previous round, by a Yarn Over, so I like to knit through the back of it, to give it a little twist . This " through the back loop" purling only happens on this row
, and only on the two stitches that were made by the Yarn Overs in the previous round.


Purling through the back loop...


Purl the next stitch as normal, then purl through the back loop of the following stitch and finally purl the last stitch of the 5 stitches that make up your bobble.
Your work should look like the picture above.


Turn your work around, and knit all 5 stitches. Turn your work around.


Now purl all the stitches of your bobble again., and turn your work around for the last time.


Knit the 5 stitches for the last time. If you push your finger into the back of the bobble to pop it out a bit, you'll see how nice and fat it is :)
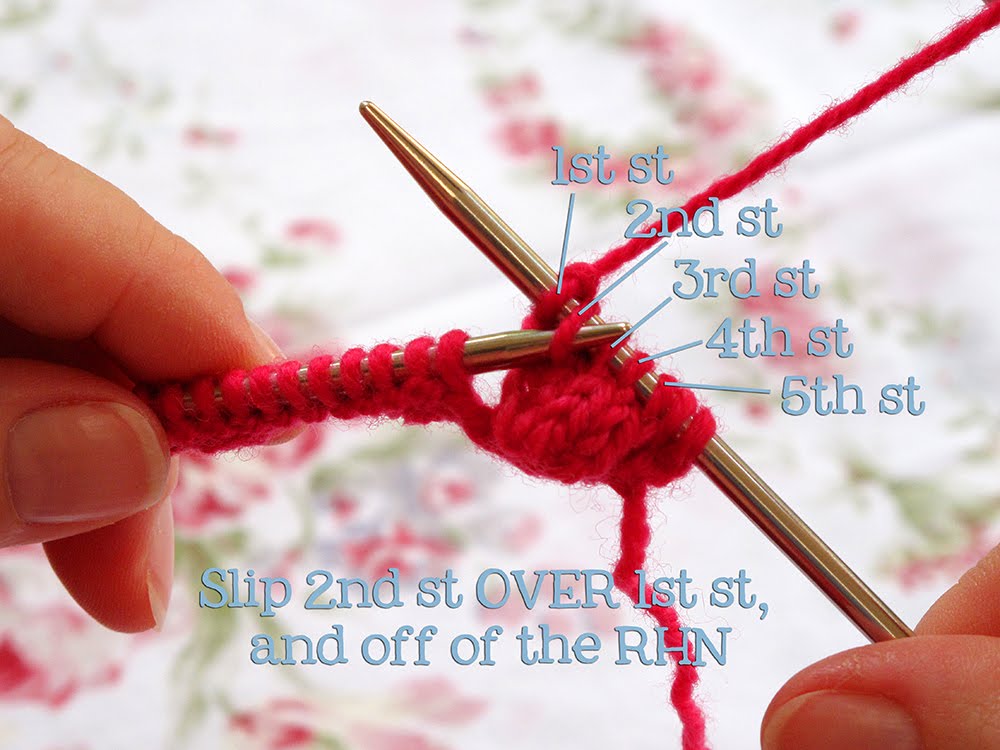

Using your LHN, slip the 2nd st of your bobble, over the 1st st, as seen above.


You have a little gap that has formed where the 3nd stitch has been slipped over the first.


Slip the 3rd st of your bobble, over the 1st st, as before...


Repeat the above process until you have slipped the 5th st of your bobble over the 1st st. You should have 3 stitches left on your RHN, 2 knit stitches from tight at the beginning of the row, and the single stitch (1st) of your bobble.


Knit 3 stitches from your LHN, and repeat the bobble making process into the next stitch on your LHN. Repeat until the right amount of bobbles have been made. Carry on with your pattern.

I must say that I really love this bobble cast on (although strictly speaking , it isn't really a true cast on , as you have knitted one row before starting to make bobbles).

Hope you all make many stunning items using this cute Bobble edge, :)

Have a good evening,
♥

Thursday, February 3, 2011

The Pretty Picot Cast On...a Tutorial

Well today was quite a day! I had to do some proverbial emotional tap dancing, but it is testimony to my blogged determination to bring you a small post, and keep my promise! To this, I must add some explanation...

I have uploaded two videos demonstrating the details of today's post, but in the first video, I was alone, and had to content with severe body contortion and a deep sustained squint (I was eventually sure that I was looking myself in the eye...) in order to film this here little clip...

Normally my precious daughter does the filming while yours truly demonstrates knitting bliss, but in the first video, I set up my trusty tripod and after considerable trial and error , I managed to get the whole thing focused, while leaning, arms akimbo, back pretzeled, around the darned tripod. This resulted in me only being able to see what the heck I was doing , by looking at the video viewer a half inch from my nose :[

Ok, so what am I trying to say? The video makes me look like I am trying to knit while demonstrating sign language, so please forgive this ambisinistrous knitter...


The Picot Cast On...with a twist!

Ok, so you know how you sometimes want to make something uber-girly and adorable, and you are not sure exactly what kind of embellishment will add that certain " Je ne sais quoi..." without making you (or your recipient) look like a deranged escapee from the Barbara Cartland fan club? Well, search no more! 'Cos here , on your friendly neighbourhood blog, you will find just the thing!

Now, I am sure that the vast majority of readers out in Blogland, have already come across or even mastered this little cast on, and if you have, I am sorry... a tedious description will now follow...

The idea with the Picot Cast on is to create a set of little bumps at the cast on edge of your knitting. This adds a bobbly , pretty border, and is useful for a variety of items, including the ever mentioned babywear, blanket edging, mittens, gloves, scarves, hats, sweaters etc etc .... in fact anything that you can cast on for :)

If you Google "Picot Cast On" you will get a gazillion hits, and your monthly download package will be used up if you just watch the first twenty videos that pop up, so please don't think this way is the only way...it is merely how I like to do things :)

Most of the web sources will describe the picot cast on by using 5 stitches initially.

So it goes something like this...

Cast on 5 stitches.

Knit 2 stitches.

Bind off one stitch on your right hand needle, by slipping the far right stitch over the second stitch that was knitted.

You have one stitch left on your right hand needle.

Knit one stitch.

Bind off one stitch just as before.

You have 2 stitches left on the left hand needle, and one stitch on the right hand needle.

Slip the right hand needle stitch (remaining), onto the left needle.

You now have three stitches on the left hand needle.

Cast on four stitches.

(NOTE: You started with 5 stitches, bound off two stitches, and were left with three stitches. The stitch you slipped from the right hand needle to the left COUNTS AS THE FIRST STITCH, of the five you need in total, ie you cast on 4 extra stitches to make up FIVE stitches to work with, just as in the beginning).

You will have a little gap between the first two stitches on your left hand needle, and the stitch you slipped from the right hand needle to the left.

Repeat from process from the beginning...knit 2, bind off 1, knit 1, bind off 1, slip remaining stitch to left needle, cast on 4. There you go :)


Your knitting should look like the pic above. I am not wild about the look of these funny little picots...they kinda look like (please excuse the phrase...) little udder teats...not nice and bobbly-like... So I sat in bed one night, knitting and fiddled with this. How could I make them look rounder and cuter?


First I thought I would make the picots, using only FOUR stitches instead of five, making them crowd together and perhaps make them fatter that way. Above is the result. The bit of knitting has a natural tendency to curl up, since it is stocking stitch after all, but I think that the four stitch picot cast on worsened the curl up. Hmmmm...so back to the drawing board....


In the pic above, I have taped the knitted piece down to force it flat, so that you can see the effect. It's better, in my humble opinion, but the curl up is too much to deal with....


Then I added a twist...and I had a zen moment. In the pic above you can see the roundy, fat little picots that were made. It is extremely difficult to describe a three dimensional technique in written words, so I have made a video showing exactly what I did. It's the second video. I am going to add a written description as well...just in case ;)

Cast on 5 stitches.

Knit 2 stitches.

Bind off one stitch on your right hand needle, by slipping the far right stitch over the second stitch that was knitted.

You have one stitch left on your right hand needle.

Knit one stitch.

Bind off one stitch just as before.

You have 2 stitches left on the left hand needle, and one stitch on the right hand needle.

BEFORE SLIPPING THE STITCH ON YOUR RIGHT HAND NEEDLE ONTO THE LEFT HAND NEEDLE, rotate your right hand needle through 360 degrees, moving away from you .

Slip the right hand needle stitch (remaining), onto the left needle.

You now have three stitches on the left hand needle.

Cast on four stitches.

(You started with 5 stitches, bound off two stitches, and were left with three stitches. The stitch you slipped from the right hand needle to the left COUNTS AS THE FIRST STITCH, of the five you need in total, ie you cast on 4 extra stitches to make up FIVE stitches to work with, just as in the beginning).

Repeat from the beginning...knit 2, bind off 1, knit 1, bind off 1, slip remaining stitch to left needle, cast on 4.


I must say, I really like these little critters! When I started knitting, I realised that I had inadvertently created a set of eyelets just above the picots :) Of course, I had to try the four stitch picot with twist option, and yes, of course the thing looked adorable, but curled like mad.


So I went back to the five stitch picot cast on and proceeded as follows:
Row 1: Knit all
Row 2: Knit all
Row 3: Knit all
Row 4: Purl all
Row 5: Knit all
Rest of work: alternate purl and knit ie stocking stitch.

I found that this helped to uncurl the work a bit and I liked the effect of the row of purl above the picots.

Right...back to the four stitch problem...
I decided that I liked this look better, but obviously needed to add stitches to the work to allow for a bit of uncurling ...so this is what I did...


On Row 1, I knit into the front and back (thereby making one extra stitch), of the stitches shown above. I then proceeded with Row 2 exactly as described earlier on. And it worked! I made little eyelets, the picots were a little closer together, and the knitting curled a bit less...happiness!


The video above is the self flagellation one...how to make a five stitch picot cast on...

The video below is the demonstration of the twist...happy viewing!


And now, Scotty beam me up.....

Night all,

Heidi :)